Showing posts with label creative expression. Show all posts

Monday

Clubhouse Creation Station: DIY Hungry Caterpillar


Some of our favorite activities around the Clubhouse have always been to take our favorite books and bring them to life...


Tuesday

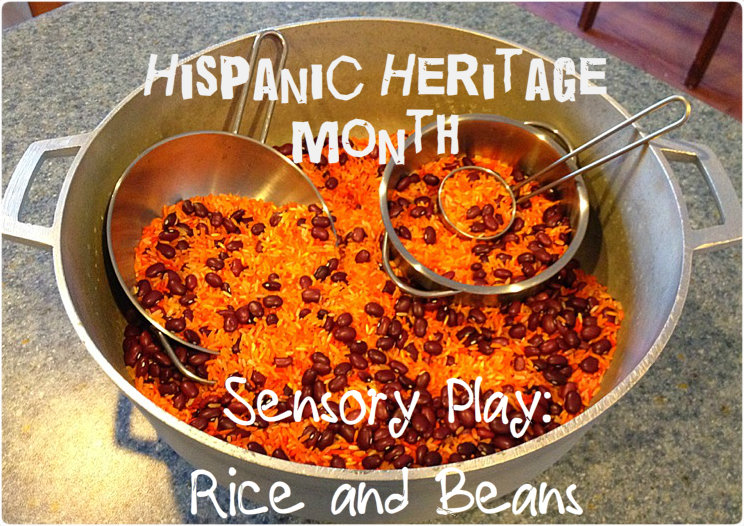
The Clubhouse Celebrates Hispanic Heritage Month: Rice and Beans

September 15th to October 15th is National Hispanic Heritage month.

What better time to introduce the language, arts, foods and celebrations of Hispanic cultures than now?

As a Hispanic mother raising a biracial, bilingual child, we often enjoy the books, foods and music of our culture. Exploring other Hispanic cultures, and bringing the fun to all of the Clubhouse Kids, is something we are excited about this month. We plan on sharing a variety of ways we delve into Hispanic Heritage over the next few weeks, but what better place to start than a good book and some rice and beans?

Friday

Clubhouse Tray: 3D Art

This activity is a perfect example of what happens when I set out a simple invitation to engage in an activity, and the Clubhouse Kids decide to pick it up and take off running.
Not literally. 
There was no running involved. 
Actually, there was a lot of sitting still involved. 
Bonus.


Saturday

Clubhouse Gak, Just Add Anything!

At the Clubhouse we call it Gak.
We make it with three simple ingredients; glue, water and liquid starch.

Then there are days where we add some extra ingredients...


Tuesday

Traveling Clubhouse: Tray Table Town

The day for us had finally arrived. It was time to take the Clubhouse on the road :)

The evening before departure my Clubhouse Kid got a sneak peek of the "Traveling Clubhouse" activity bags as I packed them into the carry on. He was definitely excited to get his hands on them, and talked about them all the way to the airport the next morning.

Travel Tip: Preparing specialized activities, and having "special snacks" for travel will give your traveling Preschooler something to look forward to. Choose activities that will be new to them and snacks they don't usually get to indulge in. Let them sneak a peek before your travels at all of the goodies that are in store, and it should help to ease the transition when it's time to leave home and board a plane, or buckle up for a long road trip.

I was convinced that my carry on full of baggies would be completely used up by the time we landed in Buffalo, NY. Oh boy was I wrong.
In a good way ;)

In this post I will share the most popular activity for my Clubhouse Kid on our travels. Special thanks to some readers who shared a sandpaper and yarn activity on the Fit Kids Clubhouse Facebook page, they inspired me to create this activity bag.


Thursday

Readathon 2012: Arthur Does Yoga

For week 2 of the Memetales Readathon 2012 we read the book Arthur. Arthur is a brown dog in a pet store who is tired of watching all of the other animals get adopted before him, so he decides to attempt to be the other animals and see if that works. As soon as we read this book, I knew how to incorporate it at the Clubhouse.

Tuesday

Clubhouse Plumbing

Did you know that Rainbow Water Beads actually does sell a pack of Rainbow water beads? I popped a pack into a bowl of water to hydrate, and then drained them. Placed them next to the Waterway Pipe Builders set. Done.

"We need a big box to catch them when they come out!"

This was true, I'm glad he thought of it. 

Had I really not thought of it myself?
  
Of course I had. I know how bouncy these little things are.
Sometimes I like to leave "something missing" and watch the Clubhouse Kids come up with their own solutions;)
After fishing out a big Styrofoam container from the pile of "just in case we can use this" recyclable materials, he was all set. 
He started with just a funnel and watched them drop into the container.  Realizing they go right through, he started constructing.

Clubhouse Painting: 23 Ways to Create and Explore with Paint

I remember as a child I painted. With paint. And a paintbrush. On paper. That just about sums it up for my early childhood Art Adventures.

Then when I was 7 my Mother married an Artist, and everything changed. He showed me how to explore mixing colors, incorporating different paints and textures. How to actually make my own paint. He even provided me with,*gasp*, a blank canvas. A variety of canvases actually, all made from different materials. You mean I can paint without having to put a certain color inside of a certain number? Thrilling!

The options, the colors, the textures, the process... it was amazing to think outside of the paint by number book.

That's exactly what I want the Clubhouse Kids to explore. No lines to be colored within, no matching colors to numbers, and no limits on how many different types of materials can be used in one work of Art.

Water Bead Paint, Petroleum Jelly Paint, Puffy Paint,
Corn Syrup Paint, Epsom Salt Paint, and
Toilet Paper Roll Stamps all make up this
Art Display at the Clubhouse.
That being said, I decided to do a little exploring online. The amazing ideas I found, coupled with some of our more recent paint creations here at the Clubhouse, leads us to this list. Together, let's see what kind of Adventures in Art we can have!

Friday

Clubhouse Paint: Cotton Balls Required

Sometimes I spot something in the kitchen/pantry/closet, and I remember a craft/activity/project I used to do back in my Preschool teaching days in Phoenix. When that happens I usually get pretty excited to bring the fun to the Clubhouse Classroom!

That's what happened in the kitchen the other day when I was unrolling aluminum foil. I couldn't believe I hadn't done this one with the Clubhouse Kids yet!

Vaseline (a.k.a. petroleum jelly) and aluminum foil.

I laid the foil out on the table, and put some globs of Vaseline everywhere.

"We're going to paint on shiny stuff with gucky stuff, yayy!"

They were excited already.

Tuesday

Clubhouse Painting: No Paper Required

Sometimes it really is so simple.

Ever since we made our shaving cream Earths, the Clubhouse Kids have been asking to paint with shaving cream. Or so I thought they wanted to paint...

We started with shaving cream (at this point we were actually using paper).

Added a little color, a few drops here and there and let them swirl it all around.


Trust me, just a few drops of food coloring go a long way in an activity like this.

The Clubhouse Kids stayed on the paper (and paper plates) for a little while...

Swirling, pressing paper on top, creating their shaving cream art.


Then they got feisty.

Monday

Clubhouse Worm Diary, Day 4

Tired of Diary of a Worm yet? The Clubhouse Kids sure aren't!

Although we have yet to discover an actual worm, they are still excited to be going along with the pages in the book and making their own fun as we go.

Today's Clubhouse Kid idea...

"Worms live under the grass, under the dirt, inside their tunnels. Let's dig holes!"


Sure we could do a little digging of our own, and see what we come up with.

Another feeble attempt at worm hunting in the desert which I knew would turn up dry. Pun intended. The desert is definitely DRY right now. Kids like to dig though, right?

Plus we are going to start our new garden this week, so that's a perfect place to start the hole digging.

We have Clubhouse Kid sized shovels, rakes and gardening gloves, so they got right to work digging...

Wednesday

Clubhouse Worm Diary, Day 2

Working our way through "Diary of a Worm", it was time to talk tunneling.

Where to begin?

Dirt Paint.

It was simple.

1 cup Flour.
1 cup Salt.
1 cup Water.
A few tablespoons of Black tempera paint.

They mixed it all up, and were pleased.

"We made dirt!"


I had another ingredient on hold,
but first it was time to start making our "worm village".

Tuesday

Clubhouse Worm Diary, Day 1

When we read in the classroom, I always let the Clubhouse Kids pick the books that are read. Sometimes this means I am reading certain books every day for weeks. I love when that happens. It means it's the perfect time to expand upon the book, and bring pages to life. The most recent book that has become a Clubhouse favorite:

It's an adorable book, written by a worm.

Well, not really, but you know what I mean.

He talks about his life, his family, his best friend (a spider), what he likes and dislikes about being a worm, and more.

They love it. Every page.

So today when it was chosen for reading again, as I knew it would be, it was easy to lead into our first "Diary of a Worm" activity... which, lucky for me, didn't involve touching an actual worm at all.

Page 1: 
"Mom says there are three things I should always remember: 
1. The Earth gives us everything we need."

Perfect place to start, especially considering all of the fun we recently had with Earth Day activities. We did everything but make an Earth, which I was saving for today.

Friday

Clubhouse Balance: A Box and a Playground

Sometimes people focus on one teaching theory above all else. Some believe that absolutely nothing of something, or everything of something else, is the only way to go. I prefer balance.  Drawing from so many different theories and practices, we find our way around here somewhere in the middle. I believe it is possible to give something, without taking away something else. In this case, a playground. The argument presented to me was that a playground, with all the "bells and whistles", would vanquish the need for a Preschooler to simply use their imagination when playing outdoors. I was able to test this theory, with a box.

It started the day the Clubhouse Kids found a box. Well, actually I found the box and made it readily available for them to find it.

First, they took to decorating it. Eventually it was covered in every thing from puffy paint to chalk and watercolors. For awhile that's all they did,
color the box.

Then one day they decided to move it.

"Under the tree, by the bush. It's a secret!"

Apparently the location wasn't secret enough though, so another day they decided to "hide" it.

They were covering it in sticks, leaves, and rocks. Enter the word of the day: Camouflage.

They went on for awhile, gathering materials from all around them and covering the box.


Using their new found word, camouflage, over and over again.


"I camowflojeddd it!"


They did some pretty great work too.
Take a look...


You couldn't find that from outer space!


The box became a hiding place, a spaceship, a race car, and a planet.

Yes, they climbed in and were on another planet. They even taped "aliens" on the  inside of the box.

I never once said what the box was, or should be. All I did was leave it in the grass.

Then one day they decided to name the box.


They took the time to write all of the letters of the box's new name right on the "door".

The name?

"HTREHHHTE"

Don't ask me to pronounce it, I get it wrong every time.

They climb in and out, sometimes one at a time and other times sharing the space. Sometimes they all stand around it and pretend someone/something is in there.

"Shhhh, it's a Lion cave. Listen..."

Not too long ago I heard a lot of noise coming from the box.
Cautiously, I approached.
You never know what HTREHHHTE is up too.

"We're on a roller coaster!!!"

The box wasn't moving. 

It's a box I left out on the grass, and they did all the rest.

They used their imaginations, they took turns, they shared space. They wrote letters, they learned new words, they created an adventure. They laughed, squealed, tossed themselves around and simply had a good time.

They did all of that while this was 40 feet away.
It is the all new Fit Kids Clubhouse Playground, equipped with a variety of swings, a slide, a rock climbing wall, fort, and rope ladder. 

They love it. 
That has never stopped them from loving the box too.

Now that's what I call balance. 

I do believe I'll keep them both :)

Ms. Liz
Linked up with: Fun Stuff Fridays Link and Learn

Thursday

Clubhouse Mandala, One Month Later

Back in March I saw this Rainbow Mandala idea on The Golden Gleam and fell in love with the colors, the concept, and how much fun I knew it would be for the Clubhouse Kids. What I didn't anticipate is how it would become an over a month long process. To some that may be a downside. Obviously, I didn't get the post out during the time rainbows were everywhere. What I did get though was a lot of focus, dedication and time spent on one project.

Plus, in the end, we got this:


We started back in March with our Rainbow Scavenger Hunt, which the kids totally loved. I must admit, we are still finding all of the colors of the rainbow hidden throughout the great outdoors. That may be part of the reason this project lasted so long. First, the kids simply just wanted to continue to collect colors. We had baskets in the classroom, one for each color, and for days they just kept adding things to the baskets, sorting through the colors, discussing rainbows.

When I introduced the poster board for the actual Rainbow Mandala, they were excited. Gluing is always popular around here! They started with red, and then they stopped.


"Can we work on this more tomorrow?"


"Next time should be orange day!"

Sure. Who I am to argue with Preschoolers who want to take their time?

When they were at orange, they decided they needed more for that ring so that led to a macaroni coloring activity. Squirting paint into baggies, squishing the macaroni around, putting it out to dry.


"This will sure look good in our Mandala!"


On a day they were working on yellow, they decided they wanted to add paper. They spent a good 15 minutes just cutting up scraps of yellow paper to add to the basket.

This went on for a few weeks.

Every class someone went over to the mandala with a basket of colors and added to a color ring.

Sometimes it was a group working on it together. The baskets and glue were readily available, so they became very independent with this entire activity.

"We gotta make sure all the colors get filled up."

That's how I watched the rainbow mandala grow over time. It simply became part of the classroom.

Then I noticed something this past week.


Could it be?! Were they going to complete this after all?

Today, it happened.

*Cue the choir*...

They had reached the inner circle!

Seeing as how they had such little space left, they now rushed through to get it done.


They worked meticulously finishing up the last colors, filling in little white spaces they found in the other colors. Finally, I heard it...

"Ms. Liz, we DID it!"
"It's a Mandalaaaaa!!!"
"We got every color!"


It was almost an emotional moment in the Clubhouse Classroom. Their work of Art was finally complete, and they were thrilled.

They high fived. They hooted. They reminisced over their hard work.

"Remember when I put that Orange dinosaur on there?"

So there you have it. The Fit Kids Clubhouse Rainbow Mandala. Once it is completely dried it will make it's way to the wall. In the meantime, the Clubhouse Kids noticed we have a lot of colors left in our baskets.

"Can we make another one?"

Sure, why not? I'm thinking it will be done around the 4th of July ;)

Ms. Liz

Linked up with:


Classified: Mom
Fun Stuff Fridays
http://theoutlawmom.com/2012/04/24/play-best-of-kids-rainbow-art-eats-activities-blog-hop/


Photobucket


Saturday

Clubhouse Spray Bottles, Water Optional

We always have spray bottles available at the Clubhouse. 

On a hot day, they have been known to cool tiny toes.

On a particularly adventurous afternoon, a couple of Clubhouse Kids ran around on the hunt for thirsty lizards that could use their assistance. 
Between the running, jumping, and squirting, 
they tackled both fine and motor skills activities for the day.

Armed with "special green water", this concoction was mixed up to make the "tree" they created grow. This "tree" made up of everything they found around our outdoor space, was the center of dramatic play for quite a few days. 
Hence, that spray bottle was always ready with the special green water.

They have squirted, spritzed, refilled and done it all over again. The spray bottles are hardly ever not being used. Who would have thought something so simple could lead to so many different ideas and adventures?

So of course, since we are in full water bead mode.. we just had to fill up our bottles with water beads and see if they would squirt. I wish I had had the camera ready when they were filling the bottles, because they were definitely having fun getting the slippery little beads through the small bottle opening. Coordination and focus at it's finest, and a lot of laughing. 

Once the bottles were full, they observed closely. 

"Do you think it will squirt out a bead?"

"It squirts bead juice!"

I squirted a few times myself and noticed that the bottles filled with water beads required a little more effort to squirt. That didn't stop the kids though, they squirted, and squirted, and squirted...

"The bead juice is slimy."
"It's shiny too!"

I have a feeling they will be filling their bottles up with "bead juice" for some time to come now.

As water bead giveaway week continues, I definitely have to share how Train Up A Child used water beads. Adding plastic eggs and lights, she created a spectacular Easter sensory experience!! Looks like I know what I'll have in the sensory table next week. Thanks Allison!

Don't forget to keep the entries coming in for the water bead giveaway! If you aren't sure how to enter, check out the details on our Facebook page.

I wonder if Lizards like Bead Juice?
Ms. Liz


Clubhouse Goop, It's MAGIC!!

When I taught in a Preschool in Phoenix, making Goop was always a favorite activity. We made it in the sensory table, we made it outside, we made it with glitter, put it in ziploc bags and even used it in dramatic play, can anyone say Goop Soup Kitchen?

The Clubhouse kids hadn't done Goop yet though... until now.

The ingredients are simple.

Water.
Cornstarch.
Food Coloring.


So where does the magic come from?

Honestly, the kids add that part.
Pour corn starch in.

Start with 1 cup of Corn Starch.
FitKid Tip: (*These tips are from the kids, because they know how to do it all, don't they?) "Pat the cup, more stuff comes out."

Next, add food coloring to 1 cup of water.
FitKid Tip: "Add lots of colors!"

Add food coloring to Water.
Sure, why not? We add Red, then we add Blue.. and *presto*, we made Purple water. Whenever using color, be it paint or food coloring or watercolors, there is always room for color blending. Why just use the color Green, when you can have the kids mix Yellow and Blue and see what happens?

Add water to Corn Starch.
Add the water to the corn starch, and then let little hands mix it all together.
FitKid Tip: "I can do it myself!"

This is where all of the Scientific evaluations come in:

"It's slimy!"

"It's soft!"

"It's stuck!!"

Doesn't take long before they start to realize the consistency of Goop. It will flow like liquid when pouring slowly, and yet you can still roll it into a ball. A ball that will "melt" away as soon as you stop rolling. It can get so hard you can crack it, yet it will still flow through your fingertips. Little hands may get sticky, but little brains are processing the way polymers work. Yes, I said polymers.. and I totally looked that up. I don't remember a thing from Chemistry class. The kids had a much better explanation than the Scientific one though,

"This is MAGIC!!"

Wasn't long before we got another FitKid Tip: "Add more colors!" 


So, we do.

                                         
A few drops of food coloring, and you can actually "paint" designs right into the Goop. Our Goop went from Purple, to Blue, to Green.. as fingers swirled around.


The consistency and texture changes that occur as it is touched, along with the changes in color, and the ability to create their own free flowing Art, made this whole process exciting for the kids.

Quite beautiful as well.

Once we added so many colors, and little fingers were done creating their works of Art, we decided to pour the Goop and see if that would mix all of the colors together. Although the Goop had gotten pretty firm while sitting in the container, it still poured freely... to the Oohs and Ahhs of
"We made a Rainbow!"


Once in the cup the kids continued to observe how the colors were still separate and how the Goop they had just poured, was now firm in the cup.

We continued to pour from cup to the original container and then back again, watching colors dance and Goop change. This was one activity that kept everyone's attention for awhile, and although hands may have gotten a little sticky and temporarily color tainted... it was definitely worth the mess.

Speaking of mess, Goop is actually quite easy to clean up. Let the splashes all over your work area dry, and then it will all flake right off in a powdery substance. I left the Goop out all night so the kids could observe the changes in it the next day.

We were left with something you could crack and smash into a powdery substance. Another activity that kept the kids busy for awhile. All I had to do in the end was dust and vacuum.

Now isn't that worth this face?


Here's to making Magic and creating Rainbows,

Ms. Liz